Implement Living Documentation with Mkdocs
I have been writing my projects’ documentation as code for some time now and have recently discovered Mkdocs and its framework Mkdocs Materials.
It allows you to quickly and effortlessly generate your documentation as a website.
The large number of themes and plugins can help you add tons of functionality to your site and the results look very professional.
I also love writing automation tests using puppeteer to cover the main use-cases of my web applications.
Even if the tests are not automated in a CI pipeline, I still run them locally, and it saves me lots of time on testing.
Some years ago I attended a Meetup event, where a person had presented the idea of “living documentation” and I thought that my current project is the perfect opportunity to test this technique. It fitted perfectly with all the tools that I was already such as cucumber, puppeteer and mkdocs.
Living Documentation and its Benefits
Let us quickly detour to why “Living Documentation” is so important. It establishes a coupling between the documentation and the behavior of your application in such a way that whenever the doc, the test or the app are modified the change is detected, usually resulting in a failing test.
By coupling the documentation with the code, we force the team to always keep both updated. It is some additional work, but the quality benefits easily outweigh the time spent on the living doc.
The written documentation becomes the requirement expression thus saving us time and avoiding repetition. The requirements are of course human-readable,
since the whole idea of Gherkin is to express functional business requirements.
If the documentation is written in a clear enough manner, we can even use it as user guide.
Read more on BDD at Behaviour Driven Development - Wikipedia
Frameworks and Technologies
I have been using puppeteer for some years now and is now my go-to automation library. Puppeteer is a Javascript framework, so naturally I used cucumber-js implementation to write my Gherkin.
A lesser-known feature of Gherkin is that it supports Markdown Syntax which is a great way of writing some beautiful scenarios with formatting and images.
Mkdocs’ pages are also written in Markdown, so it seemed we are at a good start.
User Stories as Mkdocs Pages
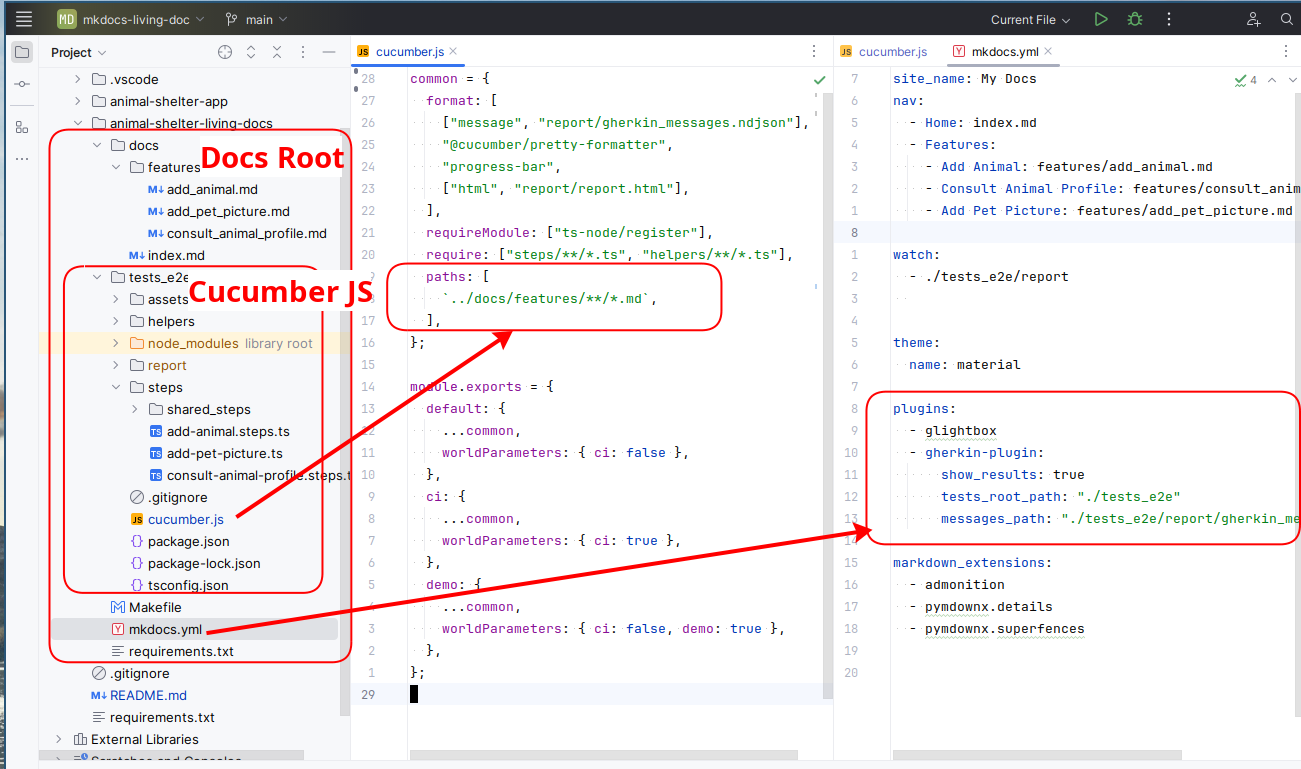
Configuring cucumber-js to read my user stories from the Mkdocs site was as straight-forward task and I simply had to modify the cucumber.js config file’s “paths” section:
In cucumber.js:
module.exports = {
    default: {
        // ...
        paths: [
            `../docs/features/**/*.md`,
        ],
    }
};
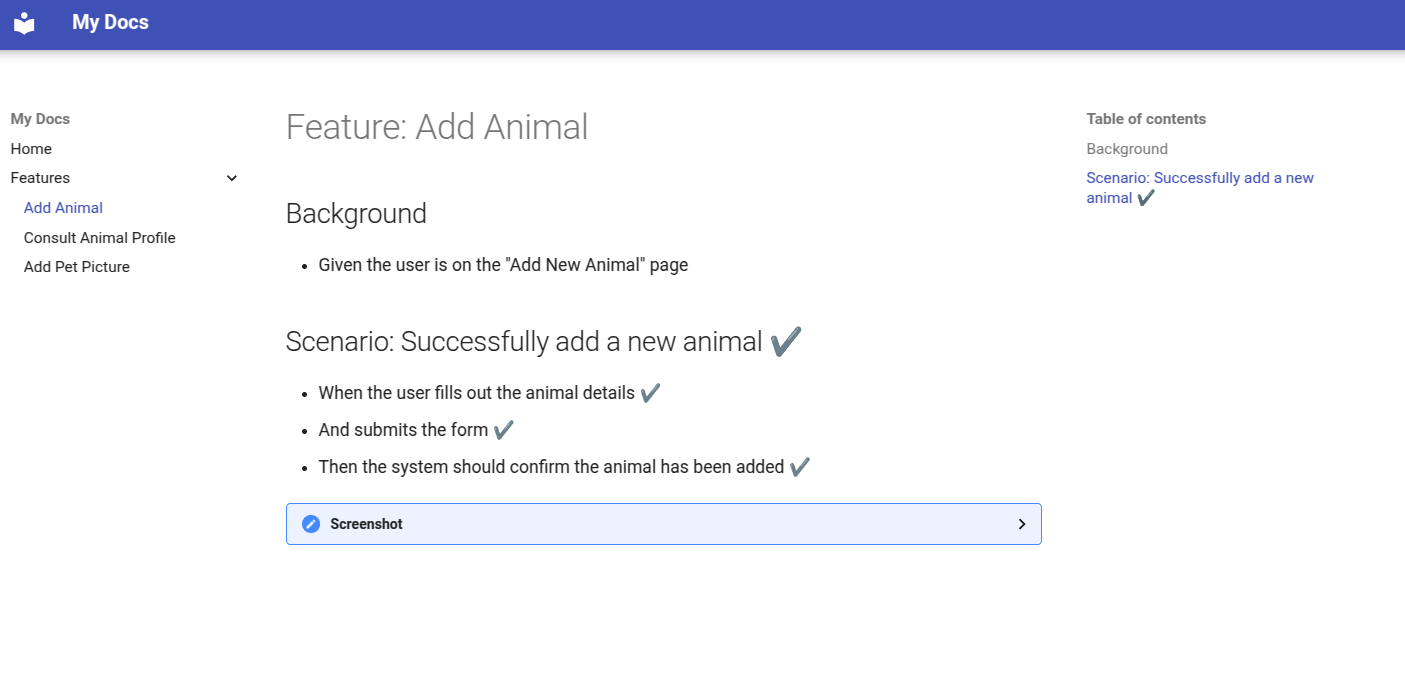
I had to tweak the documentation a little in order to follow the Gherkin Markdown syntax but overall it was fast and easy: Using the key features of Gherkin such as “Feature, Given, When, Then” etc.
In docs/features/add_animal.md:
# Feature: Add Animal

## Background

* Given the user is on the "Add New Animal" page

## Scenario: Successfully add a new animal

* When the user fills out the animal details
* And submits the form
* Then the system should confirm the animal has been added
Then there are the classic “steps” implementations. I will spare you the implementation details here, but you are welcome to check the example project I have created for this article:
https://github.com/sashokbg/animal-shelter-living-docs
Gherkin Results in The Documentation
In order to complete the circle and truly have a living documentation we need to somehow inject the results of the test runs back into our doc.
Cucumber-js has adopted a “messaging” pattern a while back in the form of a “ndjson” file that gets updated as tests progress.
This model provides a universal way of connecting to external tools, so I thought there might be something already written for Mkdocs.
Searching the internet for an existing plugin however, yielded no results, so I decided to write my own.
Writing My Own Mkdocs Gherkin Plugin
Writing plugins for Mkdocs is more or less straight forward. You need to extend a base class and override one or more method hooks.
In my case I needed to override the “on_page_markdown” callback and edit the markdown of each page before mkdocs converted it to HTML.
The plugin reads the results of the gherkin messages report and will parse each test case and its outcome plus the related file and line.
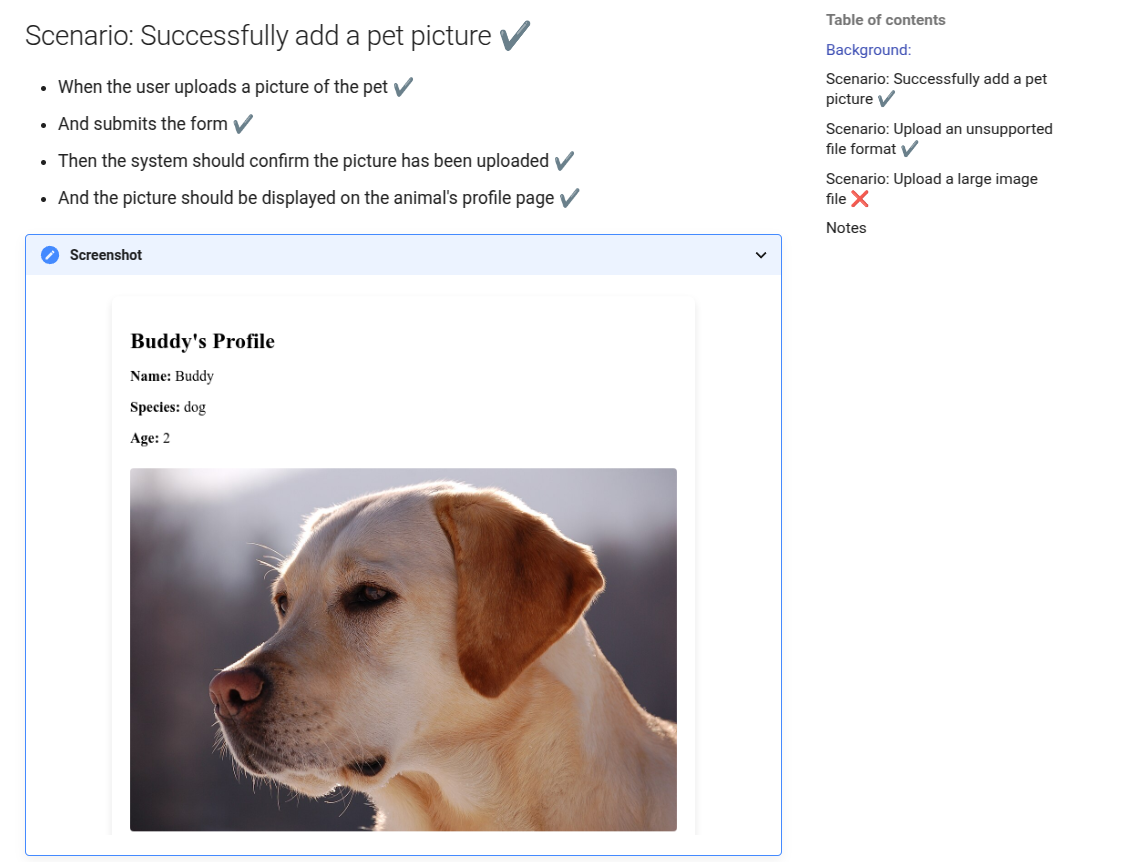
Combining all of the above information is sufficient to insert an “OK” or “NOK” status at the end of each test (or pickle as they call it).
Below is an example of the resulting code doc:

You can take a look at how it works in details here
https://github.com/sashokbg/mkdocs-gherkin-plugin
Attaching Images
Puppeteer (similar to Selenium) has a feature that allows us to take a screenshot of a page, or an area defined by a selector. We can combine this feature with cucumber-js’ attachments to produce an auto-updated image of our feature in the living documentation.
let screenshot = await page.screenshot({
    type: "png",
    encoding: "base64",
});
world.attach(screenshot, { mediaType: "base64:image/png" });
The Mkdocs Gherkin Results Plugin will automatically render the attached images in the resulting Mkdocs page. This way, whenever the web-page changes, your documentation will always be showing the latest version of it.

Final Project Layout

I have nested the cucumber-js project inside the mkdocs project, but this is not a requirement.
It is important to properly set the configuration for the mkdocs-gherkin-results plugin so that it can load the test results.
Running E2E Tests in Containers
Before we can integrate our Living Documentation in our project’s CICD, we need to figure out how to run it locally with containers.
Our first issue is to run a browser as a service in headless mode. Luckily there is a neat project called Browserless that does just that and that has perfect integration with Puppeteer (and other tools).
I have modified the package.json for the e2e tests to include a new run script that will run browserless.
{
  // ...
  "scripts": {
    "test": "cucumber-js",
    "tests:docker": "BROWSERLESS_ENDPOINT=\"ws://localhost:3001/\" APP_URL=\"http://animal_shelter_app:3000\" APP_UPLOADS_DIR=\"/usr/src/app/assets\" cucumber-js --profile=ci"
  }
}
There are some things to unpack here.
The new tests:docker script declares some variables and parameters:
-
BROWSERLESS_ENDPOINT: used later in puppeteer to connect to the container that runs the headless browser. It needs to be set to “ws://localhost:3001” when running locally and “ws://browserless_chrome:3000” when running inside a CI (for later).
-
APP_URL: the URL of where the frontend application is. Remember that it is the container with the headless browser that will perform the HTTP requests, so the communication is between containers - we must the container name.
-
APP_UPLOADS_DIR: Is required to properly handle form inputs that upload files. This is due to working inside a container. We also need to add a volume with our test images mounted to the browserless container (see bellow).
-
–profile: This is purely cucumber js feature that declares the “current profile”
Here is a sample code that runs the browser from within puppeteer, both in “ci” and “normal” profiles.
  let isCi = world.parameters.ci && JSON.parse(world.parameters.ci);

    if (isCi) {
      browser = await connect({
        acceptInsecureCerts: true,
        browserWSEndpoint:
          process.env.BROWSERLESS_ENDPOINT || "ws://browserless_chrome:3000/",
      })
    } else {
      browser = await puppeteer.launch({
        defaultViewport: null,
        headless: headless,
      });
    }
Our docker compose is relatively simple. Do not forget to mount any test files that are needed during the tests.
services:
  browserless_chrome:
    image: "browserless/chrome"
    ports:
      - "3001:3000"
    volumes:
      - ./animal-shelter-living-docs/tests_e2e/assets:/usr/src/app/assets

  animal_shelter_app:
    build:
      context: animal-shelter-app
    ports:
      - "3000:3000"
We can finally run spin up the compose and run the tests with:
docker compuse up -d
cd animal-shelter-living-docs/tests_e2e
npm run tests:docker
Debugging
Local debugging is more or less easy, with the only downside being that there are no good IDE integrations for running a single Scenario from the Markdown Gherkin. Aside from that classic debug breakpoints will work as usual - it is all just JS code.
Docker debugging is a bit harder due to multiple layers of abstractions added by the containers etc. Sometimes our tests work locally but not in docker and things get harder.
One feature of the Browserless project is the ability to monitor the current execution via a web interface. Just navigate to http://localhost:3001 and click on the “stream” icon on the left while your tests are running in the background.
Pipeline Integration
Integrating the tests in a CICD pipeline such as Gitlab can now be done easily. We can leverage Gitlab Services feature to run all our requirements: back, front, browserless, etc
The only downside of using Gitlab services is that they have somewhat limited functionality, compared to a full-fledged docker, especially the lack of volumes.
The problem can easily be solved by building and tagging custom docker images that contain all the required files and configs for the tests.
Final Thoughts
Integrating Gherkin user Stories with Mkdocs is a great way of creating a beautiful and very expressive Living Documentation.
Although there are some technical challenges the investment is worth it and will give your project a single source of truth and a common communication medium between techs and product owners.
I hope that this article and the example project can be a good jump-starter for anyone interested in BDD and Living Documentation.